Using the Testing Module to Pass or Fail an Equipment
This tutorial shows you how to use the testing module to pass or fail an equipment in RazorERP.
1. Navigate to Recycling>Inventory Detail.

The Inventory Detail page will be displayed.

2. Navigate to Testing tab.
The Testing section will be displayed with list of orders.

3. Select the order that you wish to test from the list.
4. Click TEST.
The Test page for the selected item will be displayed in the edit mode.
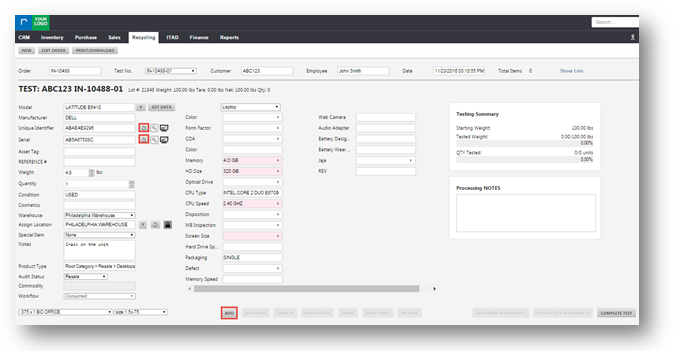
5. Enter the model number in the Model field.
6. Enter the manufacturer name in the Manufacturer field.
7. Click ( ) icon to generate unique identifier in the Unique Identifier field.
8. Click () icon to generate serial number in the Serial field.
9. Enter the weight of the item in the Weight field.
10. Enter the number of items required in the Quantity field.
11. Select the condition of the item from the Condition drop down list.
12. Select the warehouse from the Warehouse drop down list.
13. Select the location to assign for the warehouse from the Assign Location drop down list.
14. Select the type of status from the Audit Status drop down list. The available options are Scrap and Resale.
Note: Enter the details if necessary in any other fields.
15. Click ADD.
The notification asking to confirm will be displayed.

16. Click Yes.
The test page will be displayed.

17. Select the item from the list.
18. Click BULK ADD.
The Bulk Insert dialog will be displayed.

19. Enter the number of items in the Quantity field.
Note: You can select or un check Auto Generate UID checkbox and Auto Generate Serial checkbox.
In this example, Auto Generate UID option is selected.
20. Click GENERATE.
The specified number of items will be displayed.
21. Enter the serial number in the row of the item in the Serial field.
22. Click Save.
The Print a Queue dialog will be displayed.

23. Click Print.
The items will be printed.
Similarly, follow the above steps to add more items and update the details of the item. The items will be displayed in the list.

24. Select the item that you wish to update.
25. Enter the required fields to update.
26. Click UPDATE.
The item list will be updated.

27. Enter the notes if any, in the Processing NOTES field.
28. Click COMPLETE TEST.
The Testing Summary dialog will be displayed.

29. Select the commodity from the Commodity drop down list.
30. Select the type of workflow from the Workflow drop down list.
31. Click Complete Test.
32. Navigate to Recycling>Inventory Detail.

The Inventory Detail page will be displayed.
33. Navigate to History tab.

You can view that the item has been processed completely.
34. Navigate to Recycling>Settlement.

The Settlement page will be displayed.

35. Select the order from the list by double clicking.
The Settlement page will be displayed in the edit mode.

36. Select Processed & Audit from the View section.
37. Navigate to Audit/Test tab.
The list of items will be displayed.
This is how you can test the equipment using the testing module to pass or fail the equipment.