| Widget Connector | ||||||
|---|---|---|---|---|---|---|
|
This tutorial shows you how to create an RMA (Return Merchandise Authorization) for a sales order and send the customer a return shipping label. In case of damaged product or any issue with the product, the customer may contact to return the product. In that case the customer must be given a return shipping label with RMA number. No returns will be accepted without this number.
1. Navigate to Recycling Sales > Outbound Sales Orders.
The Outbound Sales Orders page will be displayed.
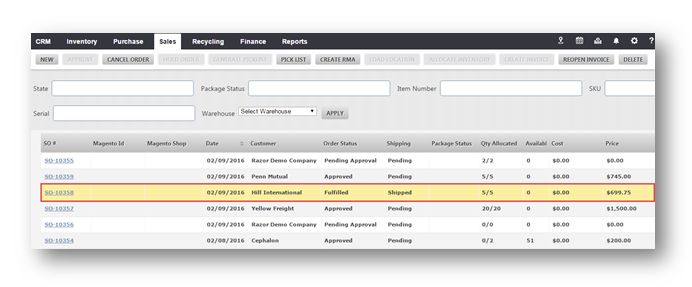
You can view all the outbound sales orders that are in the system.
2. Select the sales order for which you wish to create RMA.
The selected sales order will be displayed.

Note that this sales order has already been completed. There might be some items that are returned. So we create RMA for this and send the customer a shipping label.
3. To create an RMA, click Create RMA button.
The RMA process dialog will be dispayed.

4. In the Step 1, select the item(s). There might be several items on a single sales order and only some or all of them may be returned. So you will select the items that might be returned.
5. Select the reason for return from the Return Reason field. The available options are Bad, Broken Part, Does Not Want Anymore, Incorrect Item Sent and Quality Concern. In the example here, Bad is selected.
6. Enter the comments in the Comments text entry box.
7. Click Next.
The Step 2 : Choose RMA Workflow will be displayed.

8. Select the type of the RMA Type from the drop down list. The available options are RMA with Credit, RMA No Credit and RMA Credit Only. Generally the standard option is RMA with Credit. With this, you get the item back and give the customer credit for it.
9. Specify whether you providing a return label or not by selecting Yes or No option from the Provide Return Label drop down list. In most cases, if the item is damaged you normally would provide the return label. If they are returning it because they do not want it, you would select No because they have to pay for the return label.
10. Enter the email address to notify, in the Email text entry box.
11. Click Next.
The Step 3: Confirm Address Information will be displayed.

In this section, you’ll confirm the address information. Make sure that the From Address and To Address are correct. If any thing is missing, edit and correct it.
12. You may enter/edit the details of package such as Length, Width, Height and Weight. The pakage weight must be entered and it cannot be a non-zero value.
13. Click Next.
The message showing that package weight must have non-zero value, will be displayed.
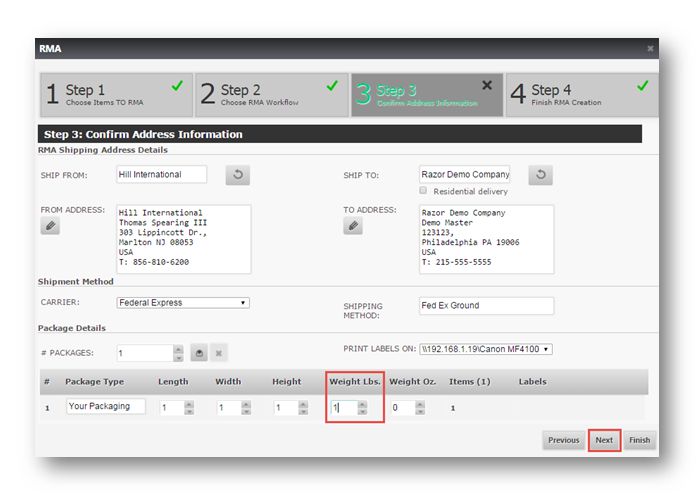
14. Enter the weight in the Weight Lbs field.
15. Click Next.
The Step 4 : Finish RMA Creation dialog will be displayed.

16. Select Send Email To Customer Now.
17. Click Finish.
This will move the item over into the RMA status. Email will be sent to the customer and you can finish the complete process of getting the return and refunding the customer at a later date.