Schedule an Inbound Order using a Common Carrier
An inbound order is an order through which you are receiving material into your warehouse from an outside source. In Razor, you can select different logistic types for inbound orders, like orders using your own trucks, a common carrier, or a client drop-off. In this tutorial, we will show you how to schedule an inbound order using a common carrier. This is a short explanation and shows you the minimum information to execute your inbound order.
The items ordered by the customers can be delivered through a common carrier as per the preference of the customer.
1. Navigate to Recycling > Inbound Orders.
The Inbound Orders page will be displayed.

2. Click Create.
The Creation of Quote/Order page will be displayed.

3. Enter the first two characters of the customer name and the drop down list shows the related customer names. Select the customer.
Note: The fields REP, SO Terms and Warehouse are automatically populated.
4. Select the Logistic Type as Common Carrier.
5. Enter bill of lading number of the order in the BOL# field.
6. Select the purchase order number from the PO# drop down list.
7. Add any internal notes in the Internal Notes field.
8. Select the type of the service from the Service Type drop down list. The available options are Electronics Disposal, Data Destruction, E-waste Removal Service, On-site HDD Destruction and Off-site HDD Destruction. In this example, it is On-site HDD Destruction.
9. Select the pickup date from the Pickup Date calendar.
10. Set the starting and ending service time availability in the Time Window field.
11. Select the type of the truck in the Truck Type drop down list. In the example, 40 ft. truck is selected.
12. Make sure that the contact details are correct in the Contact Details section. You can add a new contact by clicking the Add ( ) button or edit the existing contact by clicking Edit (
 ) button.
Scroll down for more options.
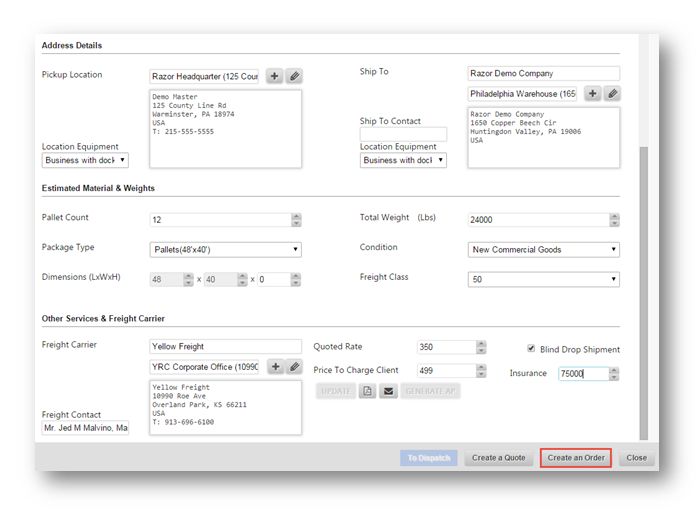
13. Review the Pickup Location and Location Equipment details. It is the location from where the items will be picked up. If this is not correct, edit it by clicking Edit () button.
14. The Ship To Contact and Location Equipment details can also be reviewed. It is the location to where the items are to be shipped.
15. Add up the pallet count to specify the number of storage units being picked up in the Pallet Count field.
16. Select the type of the package from the Package Type drop down list. It is the size of the storage units used to carry the items. In the example here, Pallets (48X40) is selected.
17. Enter the dimensions (length, width and height) in the Dimensions (LxWxH) field. This is going to affect the total weight of the truck.
18. Enter the total weight of the truck in the Total Weight (Lbs) text entry box. In the example here, 24000 is entered.
19. Select the condition in the Condition text entry box. In the example here, New Commercial Goods is selected.Select the freight class from the Freight Class drop down list. In the example here, 50 is selected.
20. Select the name of the freight carrier from the Freight Carrier drop down list. In the example here, Yellow Freight is selected.
21. Select the person of contact from the Freight Contact drop down list. It is the name of the person who is the point of contact for the freight. In the example here, Mr. Jed M Malvino is selected.
22. Enter the quoted rate of the sales in the Quoted Rate field. In the example here, 350$ is entered.
23. Enter any price to charge your client in the Price To Charge Client field. In the example here, 499$ is entered.
24. You can check the box in Blind Drop Shipment field, so that the frieght information will be send to the end user.
25. Enter the insurance amount given to this order in the Insurance field. In the example here, 75000 is entered.
26. Click Create an Order.
The message box asking you to confirm the applying of the contract with the customer to this order will be displayed.

27. If you wish to change the contract, select it from the drop down list.
28. Click Yes.
The message box informing you about the successful creation of the order along with the order number will be displayed.

You may click on the order number link to view and edit the order created.
