Inventory Attributes and Attribute Sets
This tutorial shows to configure and manage all of the different settings specific to inventory attributes.
1. Navigate to Settings>System Settings.

The Admin Screen page will be displayed.

2. In ADMINISTRATION section, navigate to INVENTORY ATTRIBUTES tab.
The INVENTORY ATTRIBUTES page will be displayed.
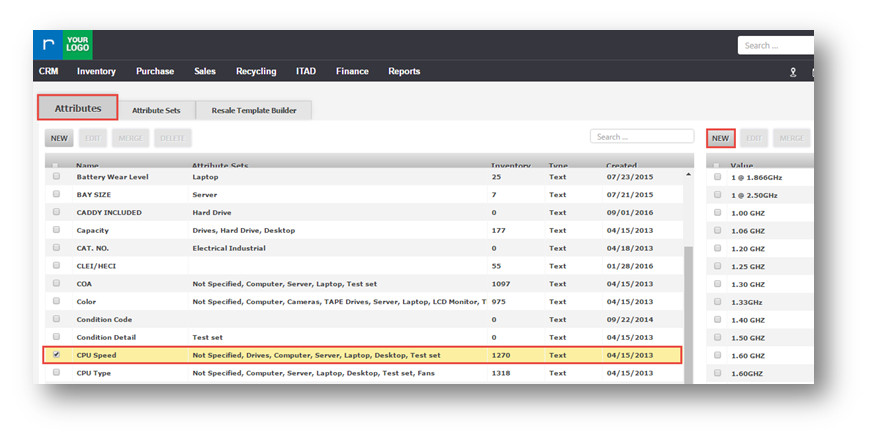
3. Navigate to Attributes tab.

Add New Attribute
A. Click NEW in the Attributes section.
The New Attribute dialog will be displayed.

B. Enter the name of the attribute in the Attribute Name.
C. Select the default set of attribute from the Default Set drop down list. Some of the options include Battery, Cameras, Laptop etc.,
D.Select the type of attribute from the Type drop down list. Some of the options are Decimal, Integer, DateTime etc.,
E. Click Ok.
The Attribute is successfully added and you can assign values for the attribute.

Edit an Attribute
A. Select an attribute and click EDIT in the Attributes section.
There will appear the same dialog as the one used for creating an attribute. You can edit Attribute Name, Default Set and Type as well as when you create an attribute,
but there is a number of system attributes that cannot be renamed. They are:
- MFG Id
- Color
- Memory
- HD Size
- Condition Detail
- CPU Type
- Model Old
- CPU Speed
- Disposition
- Location
- Hard Drive Speed
- Hard Drive Type
- Firmware Version
- Memory Size
- HP
- Grade
- Defect is Unique
- HARD_DRIVE_COUNT
- REV
- Health Status
- CLEI/HECI
- ECI
- UPC
- ISBN
- EAN.
Add Attribute Value
A. Select the attribute from the list.
B. Click NEW in the attribute value section.
The Add Value dialog related to the selected attribute will be displayed.

C. Enter the CPU Speed value in the Value field.
D. Click Ok.
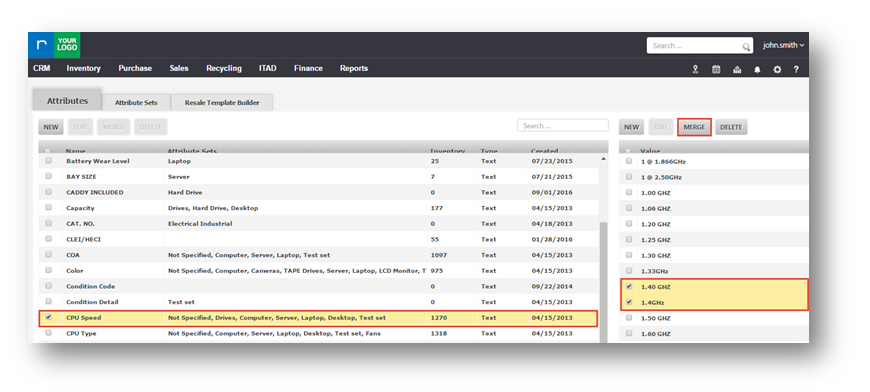
Merge Attribute Values
A. Select the attribute from the list.
B. Select the attribute values which you wish to merge by checking in the respective checkboxes.
C. Click MERGE.
The Merge Values dialog will be displayed.
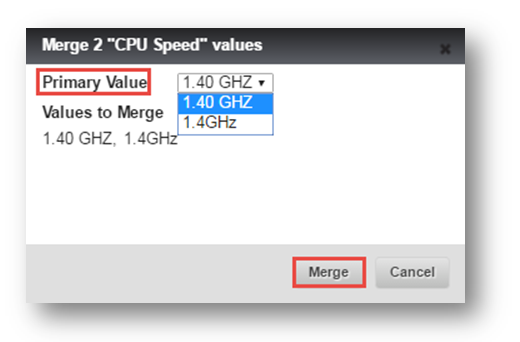
D. Select the primary value from the Primary Value drop down list.
E. Review the values to merge.
F. Click Merge.

You can view that the values are merged.
Add New Attribute Set
A. Navigate to Attribute Sets tab.

The Attributes Sets page will be displayed.

4. Click NEW SET.
The Add New Attribute Set dialog will be displayed.

5. Enter the name of the attribute set in the Attribute Set Name field.
6. Click Ok.
The attribute set will be updated.
Add Attributes to Attribute Set
A. Select the attribute set for which you want to add attributes from the Attribute set drop down list.
B. Select the attributes from the Unassigned Attributes section.
C. Click ( ) icon to add in the Attribute set section.
You can view that the selected attributes are moved to the Attribute Set section.
Set Options for Attributes in Attribute Set
You can also set options for each attribute.

7. Select the attribute set from the Attribute Set drop down list.
8. Configure what options are required for each attribute by checking or un-checking the options for each attribute set. The available options are SKU Effecting, Editable and Required.
9. Click SAVE ATTRIBUTE SET.
The attribute set will be saved.