Add a New Truck
- Lakshmi Pulomas (Unlicensed)
- MatthewM (Unlicensed)
This tutorial shows you how to add a new truck to the system. Having a well-organized trucking fleet in Razor makes it very easy to manage your logistics through the Razor Freight Planner module.
1. Navigate to Settings>System Settings.

The Admin page will be displayed.

2. In GLOBAL SETTINGS section, navigate to TRUCKS tab.
The TRUCKS page will be displayed.

The list of trucks are displayed.
3. Click ADD TRUCK TYPE.
The Create New Truck Type dialog is displayed.
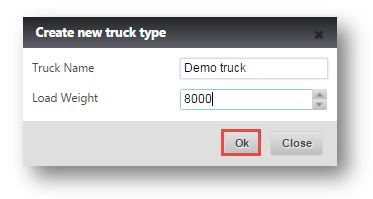
4. Enter the Truck Name and Load Weight in respective fields.
5. Click Ok.
6. Refresh the page.

The newly created truck type will be updated and displayed in the Size drop down list.
7. Select the newly created truck type in Size drop down list.
8. Enter the truck name in Name field.
9. Enter the pallet capacity in Pallet Capacity field.
10. Enter the weight in Weight Limit field.
11. Select the location in Locations drop down list and the truck will be available at the specified location.
12. Enter the Height, Length, and Width of truck in Restrictions field.
13. Select the color to represent the truck in Color field.
14. Click ADD.
The newly added truck is displayed in the list.
