Add a Resale Item to a Sales Order
This tutorial demonstrates how to add resale items to a sales order by either manually adding items or scanning a UID # directly to allocated inventory. If you manually add items, you'll then have to manually allocate the item by selecting a serial / UID # from your on hand inventory.
To add a resale item to a sales order, follow the steps given below.
1.Navigate to Sales > Sales Order. The Sales Order page will be displayed.

2. Select the required sales order. In this example, the blank sales order, SO-10315 is selected and the customer is Razor Demo Company.
The selected sales order will be displayed in edit mode.

3. In the Items section, add the resale item. If you know the SKU number, then enter the appropriate SKU number as the rest of the data will autopopulate. If you do not have the SKU number, enter the Item Number (part or model #). For example, if you enter an item number, as E6410, it will show the item, Latitude E6410 as it has been received in master items list.
4. The MFG (manufacturing) field will be automatically populated.
5. The Condition field is very important in this case. It allows you to select the condition of the item. Select the required condition from the drop down list. The available options are New, Used, Refurbished, New-Open-Box, As Is, Parts, Scrap, Testing Required, Repair, etc. If you need to make modifications to the Condition options, this can be configured in the system settings. In this example, Used is selected.
6. Use the counter or enter the quantity needed for the item in the Qty field.
7. Enter the price in the Price field to set the resale value of the item.
8. Click Add ( ![]() ) to make it available in the drop down for allocation. The new item will be added and displayed in the Items list.
) to make it available in the drop down for allocation. The new item will be added and displayed in the Items list.

Note: You may add more items to allocate even based on item's SKU and change the pricing value.

Note: Another direct option to quickly add multiple items for automatic allocation is using the scanner. Click on Scan UID/Serial field and scan the items using scanner. The items will be quickly allocated to the sales order.
9. To manually allocate the item, click the Allocate ( ![]() ) button in the row of the item you wish to allocate. The Allocate Inventory dialog will be displayed.
) button in the row of the item you wish to allocate. The Allocate Inventory dialog will be displayed.

10. Based on the available quantity, each of the items will be listed. Check the box of the item(s) you wish to allocate and click Confirm. The selected item(s) will be assigned to the sales order and displayed in the Allocated Items section.
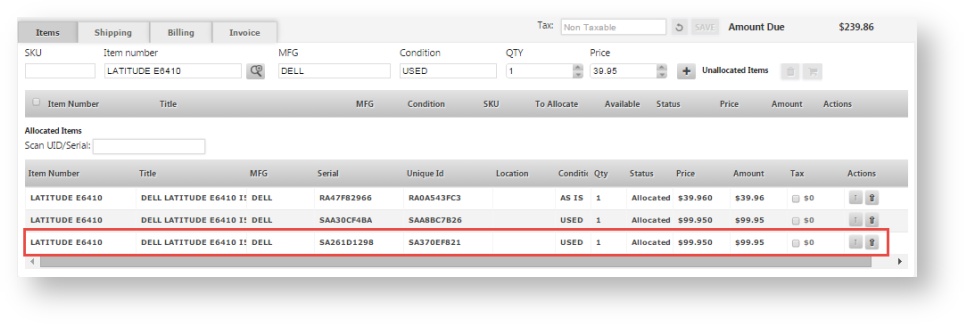
Note: It is important to note that we selected Used laptop having a resale price of $99.950.

11. We can add another item E6410 and select the Condition as As Is and it will be a totally different item with a resale value of $39.95.
Note: When you are allocating an item, you must not forget to select the correct Condition of the item because that could make the item as a completely different one than what you wanted to allocate.

So in the above example, we have a Used laptop and an As Is laptop ready to be allocated to the same sales order.
12. To automatically allocate an item, click Allocate Auto ( ![]() ) button for the particular item. The message box informing you about the automatic allocation of the specific number of items will be displayed.
) button for the particular item. The message box informing you about the automatic allocation of the specific number of items will be displayed.
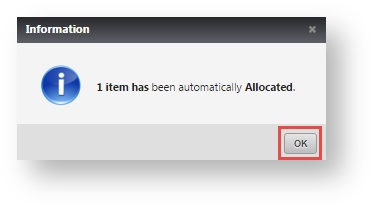
13. Click OK. The item(s) will be allocated to the sales order.